


Steps to create an Icon in Photoshop
1. First of all create a new document which is 128 x 128 pixels large and has a transparent background.
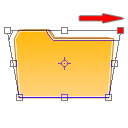
2. Make a new layer, choose the Pen Tool and draw a shape which is similar to this one:

3. Now use the following settings:
Gradient Overlay
#FFd27A -> #FFB912
#FFd27A -> #FFB912
Stroke
Size: 1px
Position: Outside
Color: #C07C33
Size: 1px
Position: Outside
Color: #C07C33
Inner Glow
Blend Mode: Normal
Color: #FFFFFF
Choke: 100%
Size: 1px
Blend Mode: Normal
Color: #FFFFFF
Choke: 100%
Size: 1px
After that it should look something like this:
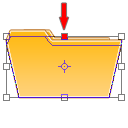
4. Then you duplicate the layer with the shape. Now you have to perspectively distort the new layer as shown on the picture:


And now scale it down a little bit, so that it looks like an 3d opened folder:
The result of step 4:
5. In this step we're going to add a piece of paper. So make a new layer and draw a shape like the one on the picture:

6. Now go to the layers palette and use the following settings:
Gradient Overlay:
Opacity: 10%
#000000 -> #FFFFFF
Angle: 50°
Opacity: 10%
#000000 -> #FFFFFF
Angle: 50°
Stroke
Size: 1px
Position: Outside
Color: #D6D6D6
Size: 1px
Position: Outside
Color: #D6D6D6
It should now look similar to this one:

7. Next you turn the piece of paper to the left a little bit and put this layer under the layer with the 3D folder thing from step 4.

8. That looks quite nice, it can be enhance by setting the opacity of the 3D folder part to about 50-60%.

No comments:
Post a Comment